Creating a Wallet (Javascript)
If you're a developer, you might be itching to create a wallet through code. Now is the time!!
Oh! No worries if you are not a developer - having the right setup allows you to easily create a wallet with just 10 lines of code.
Preview
Below are the codes for creating a wallet using JavaScript. On the right side, you'll see the results of the execution.
You can generate new mnemonic words using new MnemonicKey() from the @xpla/xpla.js module. Then, you can extract the wallet's address using the LCDClient.
If you've understood the Preview Code, feel free to skip the post-Setup section and move on to the next steps.
Creating a Wallet Using React
import { LCDClient, MnemonicKey } from '@xpla/xpla.js';

export default function App() {
    const newKey = new MnemonicKey();

    const lcd = new LCDClient({
      chainID : 'cube_47-5', // The name of xpla testnet network
      URL : 'https://cube-lcd.xpla.dev' // xpla testnet LCD URL
    });

    return <>
    <h3>mnemonic: {newKey.mnemonic}</h3>
    <h3>accAddress: {lcd.wallet(newKey).key.accAddress}</h3>
    </>
}
Using the mnemonic we've generated with code, you can initiate wallet recovery in Vault, basically bringing your wallet to life! Try connecting your wallet through the Add a wallet - Recover wallet in Vault.
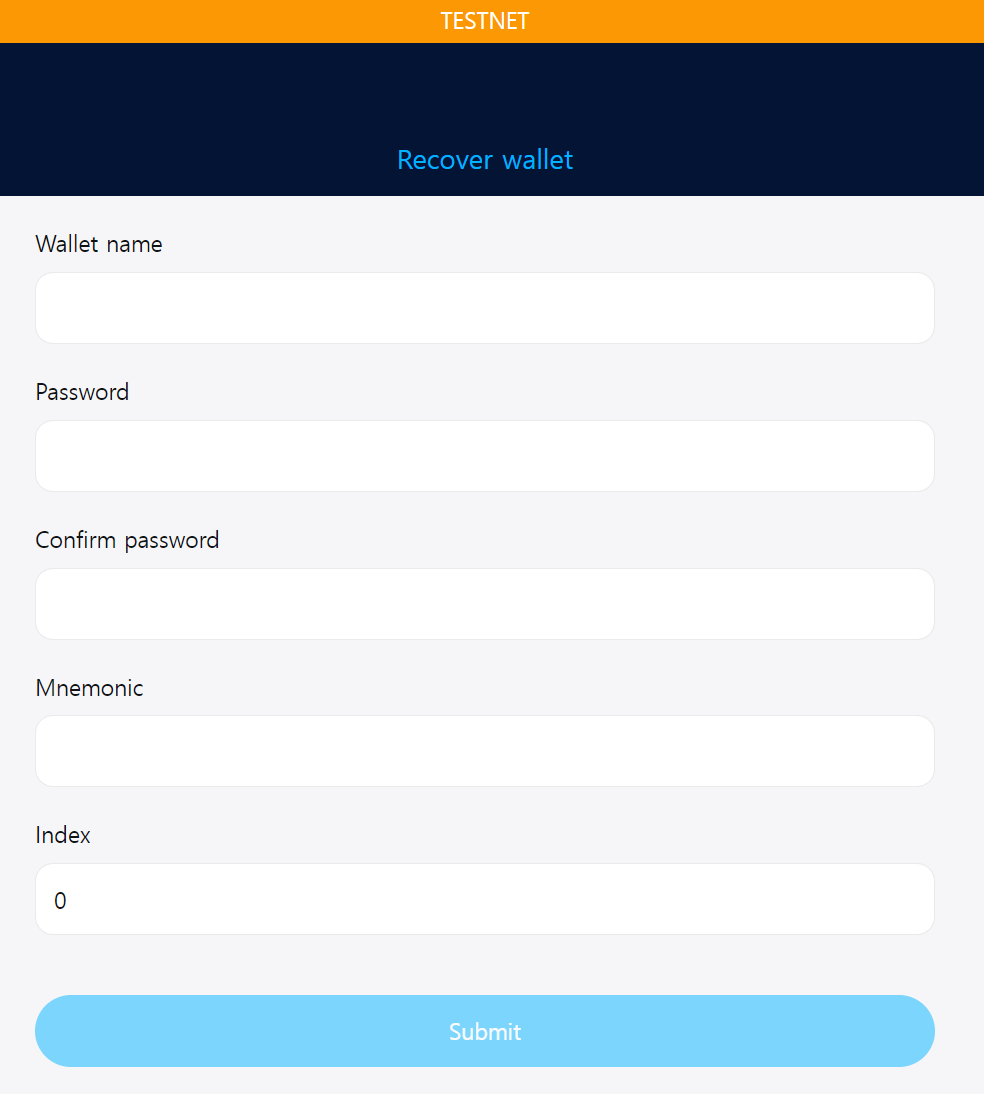
"Wallet name" and "Password" refer to the name and password you will use for your Vault wallet. "Mnemonic" corresponds to the mnemonic words you obtained from the example. For Index, enter 0 by default. If the index values are different, a different address is created even if it is the same Mnemonic.
To safely use the wallet you created with code on the XPLA network, remember to keep the mnemonic words secure. Never share them with others.
What is an LCDClient?
The LCDClient is a tool for fetching data from the XPLA blockchain. If you'd like to know more, refer to the Docs.
Even if you don't fully grasp this right now, it's okay. The key takeaway? Just remember that you can create a wallet through code!
Environment Setup
Let's delve into setting up the environment to run the code we showed you in the Preview.
1. Install Node.js
Install Node.js that corresponds to your operating system.
To verify if Node.js is properly installed, open the Terminal and type node -v.
node -v
If the installed Node.js version is displayed, you're good to go! For instance, if it shows v16.16.0, that's what you're looking for.
What's the Terminal?
- Windows
- macOS
2. Install Visual Studio Code
We'll use Visual Studio Code to easily edit code files. Let's install Visual Studio Code if you do not already have it or if you have a brand new computer!
Running JavaScript Code
Now, let's dive into running the code you saw in the Preview.
1. Setting up the environment
Create a folder for the example code files. Let's keep the name of the folder as xpla-academy-example. but just without a period.
Launch Visual Studio Code that you've installed.
In Visual Studio Code, go to File - Open Folder and open the xpla-academy-example folder.
In the left-hand EXPLORER panel, click the icon next to the folder name (New file) to create the
example-1.jsfile.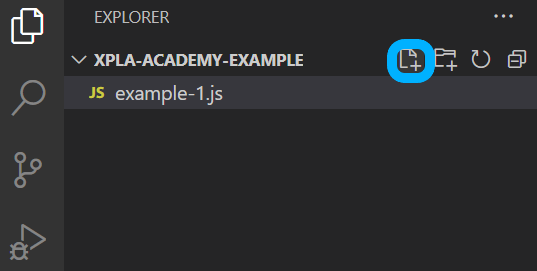
Copy the code below and paste it into the
example-1.jsfile, then save!const { MnemonicKey, LCDClient } = require("@xpla/xpla.js");
const newKey = new MnemonicKey();
console.log("mnemonic: " + newKey.mnemonic);
const lcd = new LCDClient({
chainID : 'cube_47-5', // The name of xpla testnet network
URL : 'https://cube-lcd.xpla.dev' // xpla testnet LCD URL
});
console.log("accAddress: " + lcd.wallet(newKey).key.accAddress);
2. Running the Code
At the top menu of the VSCode click "Terminal" menu. Then hit New "Terminal" (Ctrl+Shift+`) for a new Terminal. (If you don't see the "Terminal" option, make the VSCode screen fullsize.)
Type the following command in our new Terminal.
npm install @xpla/xpla.js
node example-1.js
Check the Terminal for results. You should see your mnemonic words and address.
tipIf your operating system is Windows, we recommend running VS Code Terminal with Command Prompt or Git Bash instead of Powershell. Of course, you can open the Terminal in your familiar environment.
Here's how to set VS Code Default Terminal to Command Prompt.
1. Open the Command Palette with "Ctrl + shift + P".
2. Search for "Terminal: Select Default Profile".
3. Set to Command Prompt, and run VS Code again.
Explanation
Congratulations! You've just created a Wallet just using code!
In the code below, you've used the MnemonicKey() function to generate random mnemonic words.
const newKey = new MnemonicKey();
console.log("mnemonic: " + newKey.mnemonic);
You've discovered the address of the wallet composed of the newly created mnemonic through the LCDClient.
const lcd = new LCDClient({
  chainID : 'cube_47-5', // The name of xpla testnet network
  URL : 'https://cube-lcd.xpla.dev' // xpla testnet LCD URL
});
console.log("accAddress: " + lcd.wallet(newKey).key.accAddress);
Moving forward, we'll be using Wallets to accomplish even more tasks. If you wish to continue using the wallet you've crafted through code, we highly recommend connecting it to the Vault Chrome Extension.
Using the mnemonic we've generated with code, you can initiate wallet recovery in Vault, basically bringing your wallet to life! Try connecting your wallet through the Add a wallet - Recover wallet in Vault.
"Wallet name" and "Password" refer to the name and password you will use for your Vault wallet. "Mnemonic" corresponds to the mnemonic words you obtained from the example. For Index, enter 0 by default. If the index values are different, a different address is created even if it is the same Mnemonic.
To safely use the wallet you created with code on the XPLA network, remember to keep the mnemonic words secure. Never share them with others.
What is an LCDClient?
Even if you don't fully grasp this right now, it's okay. The key takeaway? Just remember that you can create a wallet through code!