Run XPLA Blockchain Locally (Private)
In the XPLA blockchain, there's a Public Network open for anyone to join. It's called the Mainnet(dimension_37-1) and the Testnet(cube_47-5). However, exclusively developing on the Public Network has its limitations. Obtaining a significant amount of $XPLA for transaction fees can be challenging, and there might be times when you don't want to generate transactions publicly.
That's why we'll delve into running the XPLA blockchain on a Local (Private) Network. You can become a Single Validator yourself, operating a blockchain node and managing the total supply of $XPLA in the network. Through the Local Network, you can develop your very own Web3 game within the XPLA blockchain.
Index
We will explore Local Network in the following steps.
Prerequisite
In the examples, Docker is used to simplify the setup of your development environment and assist in faster development. Please install Docker according to your operating system.
In this step, the key focus is on working with the Local Network, so you don't need an in-depth understanding of Docker. By following the steps below and entering the provided code, you can easily set up the Local Network.
Setting Up the Local Network
Create a file named Dockerfile.
Copy and paste the following code into the Dockerfile and save it. This Dockerfile streamlines the process of installing xplad. For more detailed information about xplad, refer to the Docs or Github.
########
FROM golang:1.19 as builder

RUN git clone https://github.com/xpladev/xpla.git ~/xpla

RUN cd ~/xpla && \
    git checkout v1.2.0 && \
    make install && \
    mv /go/bin/xplad /usr/local/bin/xplad

RUN cp /go/pkg/mod/github.com/!cosm!wasm/wasmvm@v1.0.0/api/libwasmvm.x86_64.so /usr/local/lib && \
    ldconfig

########
FROM ubuntu:22.04 AS runner

RUN apt-get update && \
    apt-get install -y tzdata && \
    ln -fs /usr/share/zoneinfo/Asia/Seoul /etc/localtime && \
    dpkg-reconfigure --frontend noninteractive tzdata

RUN apt-get update && \
    apt-get install -y vim bash-completion wget sysstat dstat net-tools curl tmux jq dnsutils liblz4-tool pv git

RUN curl -fsSL https://deb.nodesource.com/setup_16.x | bash - && \
    apt-get install -y nodejs

COPY --from=builder /usr/local/bin/xplad /usr/local/bin/
COPY --from=builder /usr/local/lib/libwasmvm.x86_64.so /usr/local/lib/
RUN ldconfig
Building the Dockerfile will create a container image, and this might take some time to build.
docker build -t my-xpla-node .Enter the
docker image lscommand to check whether the container image was successfully created.
Create a docker container using the generated container image.
docker run -it -d --name myXPLANode -p 26657:26657 -p 1317:1317 my-xpla-nodeWhile building the Local Network, we will also use the LCDClient and RPC networks. Since the LCDClient environment uses 1317 Port and the RPC network uses 26657 Port, each port was also opened. Afterwards, enter the
docker ps -acommand to check if the docker container was created successfully.
Access the docker container via bash.
docker exec -it myXPLANode bashtipTo exit the bash in the connected container, simply type
exit. If you want to access the container again, use the commanddocker exec -it myXPLANode bash. If the container isn't running, trydocker start myXPLANode && docker exec -it myXPLANode bash.If you happen to miss a step while following the example, there's an option to reset by deleting and recreating the container. You can remove the container using the command
docker stop myXPLANode && docker rm myXPLANodeand then proceed again from Step 4.
In the docker container's bash environment, input the following command. Similar to Mainnet's chain-id being
dimension_37-1, in the example's Local Network, the chain-id is set tolocalnet_1-1. The variable yourMonikerName refers to the name of the node you're operating. Please input the desired name.xplad init --chain-id=localnet_1-1 yourMonikerNameUpon inputting the above command, a
.xplafolder will be created in the home directory (~), initializing the Genesis file.The structure of the
~/.xplafolder is as follows.. # ~/.xpla
|- data # Contains the databases used by the node.
└- config/
│-- app.toml # xplad configuration file
│-- client.toml # configurations for the cli wallet (ex xplacli)
│-- config.toml # Tendermint configuration file
│-- genesis.json # genesis transactions
│-- node_key.json # private key used for node authentication in the p2p protocol (its corresponding public key is the nodeid)
└-- priv_validator_key.json # key used by the validator on the node to sign blocksWhat is a Genesis File?
In the world of blockchain, the very first block that's created is called the Genesis block. The Genesis file is the record where all the data for this first block is stored. Every node participating in the same blockchain network needs to start block generation with the same Genesis file. As a result, right from the first block, they all share the same data, and the block hash values among nodes match.
Both Mainnet and Testnet have their own Genesis files, and you can find them on Github. If you use the same Genesis file as the Mainnet, you can operate a Mainnet Full Node (a node storing all information of the blockchain). For detailed instructions on running Full Nodes for both Mainnet and Testnet, refer to the Docs.
In this example, we're not dealing with Mainnet or Testnet but instead operating a Local Network. This is why we'll create a Genesis file directly.
Generate a wallet to use as a Validator in the Local Network blockchain. Similar to the previous step, you're creating a wallet with the same command.
xplad keys add yourAccountMake sure to enter the Passphrase correctly and store it along with your mnemonic. You'll need to input the Passphrase each time you use your wallet information.
Record the information that the created wallet will receive 100000000000000000000axpla (100 XPLA) in the
~/.xpla/config/genesis.jsonfile.xplad add-genesis-account $(xplad keys show yourAccount -a) 100000000000000000000axplaIn the following Step 11, we'll set the
inflationvalue to 0. This means that if we allocate 100 XPLA to one wallet in the Genesis block, the total supply of $XPLA in the Local Network will remain fixed at 100 XPLA. You're free to adjust the value of 100000000000000000000axpla to increase the amount of $XPLA available for use.
Register the created wallet as a Validator. The initial 10000000000000000000axpla (10 XPLA) is the amount you'll Self-Delegate when registering as a Validator.
xplad gentx yourAccount 10000000000000000000axpla --chain-id=localnet_1-1
xplad collect-gentxs
When you enter the first command, a
gentxfolder will be created in~/.xpla/config. Entering the second command will apply the contents of thegentxfolder to thegenesis.jsonfileWhat is a Delegate?
The act of entrusting a certain amount of XPLA to a validator is called Delegate, and the person who entrusted it is called Delegator. In the Proof of State (PoS) type of XPLA blockchain, validators earn fees through block creation. Delegators can earn the fees that validators earn from block creation equal to the percentage of XPLA they each delegated.
How often validators will create blocks is determined by the total amount of XPLA delegated to them. The higher the weight, the higher the block creation rate. For more details, see Docs.
Currently, the
genesis.jsonfile has a non-zeroinflationvalue. We'll change it to 0 to keep the total supply fixed without inflation. The actual XPLA blockchain Mainnet also has aninflationvalue of 0. You can find related information in the genesis file and Explorer. Details about the genesis file parameters can be found in the Cosmos documentation.sed -i "291s/0.130000000000000000/0.000000000000000000/g" ~/.xpla/config/genesis.json
sed -i "296s/0.130000000000000000/0.000000000000000000/g" ~/.xpla/config/genesis.json
sed -i "297s/0.200000000000000000/0.000000000000000000/g" ~/.xpla/config/genesis.json
sed -i "298s/0.070000000000000000/0.000000000000000000/g" ~/.xpla/config/genesis.json
Presently, the coin denomination in the
genesis.json fileis set as "stake". Since the XPLA blockchain uses "axpla" as its coin denomination, we'll adjust it.sed -i "s/"stake"/"axpla"/g" ~/.xpla/config/genesis.json
Modify the
app.tomlandconfig.tomlfiles to configure the LCDClient environment and RPC network connection.sed -i "112s/.*/enable = true/g" ~/.xpla/config/app.toml
sed -i "115s/.*/swagger = true/g" ~/.xpla/config/app.toml
sed -i "91s/127.0.0.1/0.0.0.0/g" ~/.xpla/config/config.toml
Initialize the blockchain database according to the state set in the Genesis file.
xplad tendermint unsafe-reset-all
Use the command below to run the XPLA blockchain Local Network as a background process.
xplad start &>/dev/null &If you'd like to check whether the background process is functioning properly, input
ps -A.If you'd rather observe the process instead of running it in the background, omit
&>/dev/null &and inputxplad startonly.
Local Network setup is now complete! Use the command below to inspect the information of the running Local Network.
xplad statusIf it's running well, you should roughly see an output similar to the following.
{
    "NodeInfo": {
        "protocol_version": {
            "p2p": "8",
            "block": "11",
            "app": "0"
        },
        "id": "a6c8fcd8951c4697c893976ebd9a456e1dbd4faa",
        "listen_addr": "tcp://0.0.0.0:26656",
        "network": "localnet_1-1",
        "version": "v0.34.21",
        "channels": "40202122233038606100",
        "moniker": "yourMonikerName",
        "other": {
            "tx_index": "on",
            "rpc_address": "tcp://0.0.0.0:26657"
        }
    },
    "SyncInfo": {
        "latest_block_hash": "92A29DB190CF19A193E7009CFFD2A97CF450A3304D87C85C916B895515113602",
        "latest_app_hash": "D7E013D16B47901104F3DFFCE05861E291DB98C31617155C7BCBEB8F7E2D1D02",
        "latest_block_height": "43441",
        "latest_block_time": "2023-08-07T02:39:05.4921575Z",
        "earliest_block_hash": "E3118D0BE4CD0D437843A03EB86B5B6A1B8BC0749392BB44ED32B113BAFE20F7",
        "earliest_app_hash": "E3B0C44298FC1C149AFBF4C8996FB92427AE41E4649B934CA495991B7852B855",
        "earliest_block_height": "1",
        "earliest_block_time": "2023-08-04T10:16:10.850891Z",
        "catching_up": false
    },
    "ValidatorInfo": {
        "Address": "BAE5CC7C2FB6467D0FA66BCEB01C6C8F470B0E8A",
        "PubKey": {
            "type": "tendermint/PubKeyEd25519",
            "value": "LyDR9u73BNZ+338l5L02FLi40HZ6cvqHhf5skPWVfHo="
        },
        "VotingPower": "10"
    }
}
The SyncInfo.latest_block_height value indicates the height of the latest block. This value will increase each time you execute the
xplad statuscommand. This suggests that blocks are successfully being added to the blockchain.
Using xplad on the Local Network
Let's try using xplad in the container's bash environment.
Check Balance
The XPLA blockchain is up and running on the Local Network. Let's start by checking the balance of the wallet created for the Validator.
xplad query bank balances $(xplad keys show yourAccount -a)When you input the above command, you'll see results like the following.
Enter keyring passphrase:
balances:
- amount: "90000000000000000000"
denom: axpla
pagination:
next_key: null
total: "0"
100 XPLA were initially supplied in the Genesis block, and 10 XPLA were self-delegated when registering as a Validator. Therefore, having 90 XPLA left is normal.
Check Delegated Amount
When registering as a Validator, 10 XPLA were self-delegated. Let's check this using xplad.
xplad query staking delegations $(xplad keys show yourAccount -a)You'll get results similar to the following. 10 XPLA were self-delegated.
Enter keyring passphrase:
delegation_responses:
- balance:
    amount: "10000000000000000000"
    denom: axpla
delegation:
    delegator_address: xpla1mcvhqcnjwry046rcys68hrvvefq7zvyve2tjwz
    shares: "10000000000000000000.000000000000000000"
    validator_address: xplavaloper1mcvhqcnjwry046rcys68hrvvefq7zvyvghggpl
pagination:
next_key: null
total: "0"
Create a Transfer Transaction
Let's generate the first transaction on the Local Network. In this example, we'll create a transaction where a Validator wallet sends 1axpla to itself. You can try creating transactions transferring to other wallets you create.
xplad tx bank send $(xplad keys show yourAccount -a) $(xplad keys show yourAccount -a) 1axpla --chain-id=localnet_1-1You'll get results like this. The transaction hash is
F8B522E28918C6616136C1B1C70D3B5972F06CA8E80D9BD60B6B19704BC85E5C.Enter keyring passphrase:
Enter keyring passphrase:
Enter keyring passphrase:
{"body":{"messages":[{"@type":"/cosmos.bank.v1beta1.MsgSend","from_address":"xpla1mcvhqcnjwry046rcys68hrvvefq7zvyve2tjwz","to_address":"xpla1mcvhqcnjwry046rcys68hrvvefq7zvyve2tjwz","amount":[{"denom":"axpla","amount":"1"}]}],"memo":"","timeout_height":"0","extension_options":[],"non_critical_extension_options":[]},"auth_info":{"signer_infos":[],"fee":{"amount":[],"gas_limit":"200000","payer":"","granter":""}},"signatures":[]}
confirm transaction before signing and broadcasting [y/N]: y
code: 0
codespace: ""
data: ""
events: []
gas_used: "0"
gas_wanted: "0"
height: "0"
info: ""
logs: []
raw_log: '[]'
timestamp: ""
tx: null
txhash: F8B522E28918C6616136C1B1C70D3B5972F06CA8E80D9BD60B6B19704BC85E5C
Send a Transaction Query
Let's send a query to the blockchain using xplad to retrieve the data of the transaction we created earlier. Replace the transaction hash with the one you generated. For example, the command for the example transaction would be
xplad query tx F8B522E28918C6616136C1B1C70D3B5972F06CA8E80D9BD60B6B19704BC85E5C.xplad query tx <txhash>
By utilizing xplad, we've confirmed that the Local Network blockchain is functioning properly. For more xplad commands, refer to the Docs or try xplad -h command.
Making Use of the RPC Network
While setting up the Local Network, editing the ~/.xpla/config/config.toml file granted you the access to the RPC network. If you visit http://localhost:26657/, you'll see a list of APIs you can interact with through the RPC network. Clicking on //localhost:26657/genesis? will display a JSON result identical to the content of the ~/.xpla/config/genesis.json file you configured in the example.
Furthermore, you can also access the RPC network using WebSocket. Create a JavaScript file (.js), input the code below, and run it!
const { WebSocketClient } = require('@xpla/xpla.js');

const wsclient = new WebSocketClient('ws://localhost:26657/websocket');

wsclient.subscribe('Tx', {}, data => {
  console.log('Send occured!');
  console.log(data.value);
  wsclient.destroy();
});


wsclient.start();
Running the JavaScript file alone won't yield any results yet. Go back to the docker container's bash environment and generate a transfer transaction. Once a transaction is created on the blockchain, you'll see the following log in the console where you ran the JavaScript file.
Send occured!
{
  TxResult: {
    height: '547',
    tx: 'CokBCoYBChwvY29zbW9zLmJhbmsudjFiZXRhMS5Nc2dTZW5kEmYKK3hwbGExbWN2aHFjbmp3cnkwNDZyY3lzNjhocnZ2ZWZxN3p2eXZlMnRqd3oSK3hwbGExbWN2aHFjbmp3cnkwNDZyY3lzNjhocnZ2ZWZxN3p2eXZlMnRqd3oaCgoFYXhwbGESATESYQpZCk8KKC9ldGhlcm1pbnQuY3J5cHRvLnYxLmV0aHNlY3AyNTZrMS5QdWJLZXkSIwohA/hySCvp+biiZ4d7QMI0t9kyk46nCIMwjxGYk/OiIFA/EgQKAggBGAISBBDAmgwaQbdO3umo6oa0e4J3NKtNg+cZmzaC7ljFkxsER9/T7DB5NEsP1hj0pqQjbCy0fsQt/ej+N9Mu74uj2B7ggC2HX0wB',
    result: {
      data: 'Ch4KHC9jb3Ntb3MuYmFuay52MWJldGExLk1zZ1NlbmQ=',
      log: '[{"events":[{"type":"coin_received","attributes":[{"key":"receiver","value":"xpla1mcvhqcnjwry046rcys68hrvvefq7zvyve2tjwz"},{"key":"amount","value":"1axpla"}]},{"type":"coin_spent","attributes":[{"key":"spender","value":"xpla1mcvhqcnjwry046rcys68hrvvefq7zvyve2tjwz"},{"key":"amount","value":"1axpla"}]},{"type":"message","attributes":[{"key":"action","value":"/cosmos.bank.v1beta1.MsgSend"},{"key":"sender","value":"xpla1mcvhqcnjwry046rcys68hrvvefq7zvyve2tjwz"},{"key":"module","value":"bank"}]},{"type":"transfer","attributes":[{"key":"recipient","value":"xpla1mcvhqcnjwry046rcys68hrvvefq7zvyve2tjwz"},{"key":"sender","value":"xpla1mcvhqcnjwry046rcys68hrvvefq7zvyve2tjwz"},{"key":"amount","value":"1axpla"}]}]}]',
      gas_wanted: '200000',
      gas_used: '82168',
      events: [Array]
    }
  }
}
This demonstrates using WebSocket to access the RPC network and detecting the creation of a transaction on the blockchain. Check the Docs and Github for more diverse actions you can perform using WebSocket.
Exploring with Swagger
While setting up the Local Network, editing the ~/.xpla/config/config.toml file granted you the access to Swagger API.
Open your browser and go to the address http://localhost:1317/swagger/#/Query/AllBalances.
Click the Try it out button on the top right corner, and you can directly send a query. Input your created Validator wallet address in the "address" field and press the "Execute" button.
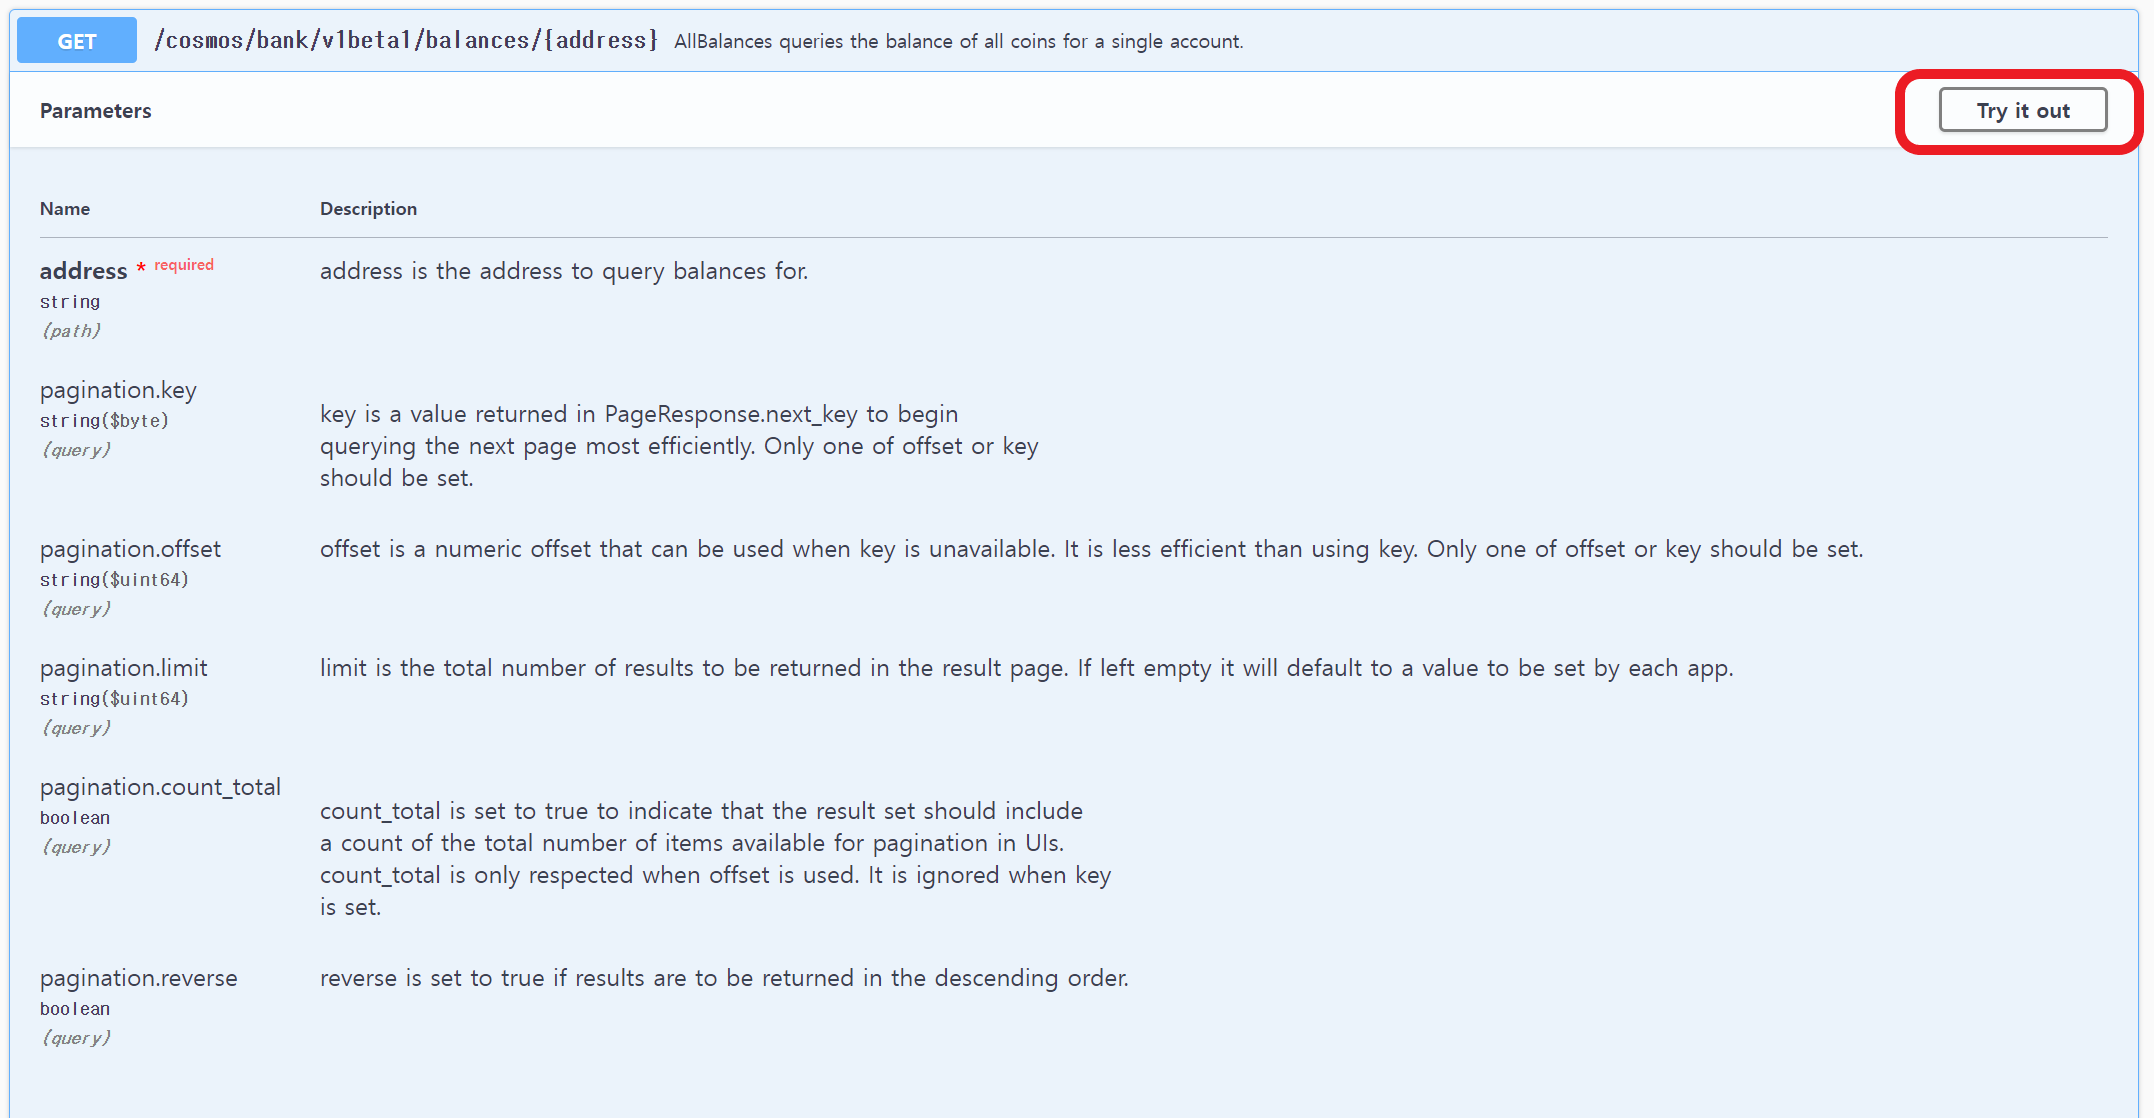
As shown in the example, you'll receive a response result.
{
  "balances": [
    {
      "denom": "axpla",
      "amount": "90000000000000000000"
    }
  ],
  "pagination": {
    "next_key": null,
    "total": "1"
  }
}
Just like you confirmed with xplad, the Swagger API works well, showing that there's 90 XPLA in the Validator wallet.
Creating Transactions on the Local Network with Javascript
Lastly, let's create a transaction on the Local Network using JavaScript. Create a JavaScript file (.js), paste the code below, and give it a try.
const { LCDClient, MsgSend, MnemonicKey } = require("@xpla/xpla.js");

const lcd = new LCDClient({
    chainID: 'localnet_1-1',
    URL: 'http://localhost:1317'
});

async function main() {
    const mk = new MnemonicKey({
        mnemonic: 'sunny apology silly butter asset win own common margin festival write bullet coast envelope front affair depart struggle taste title liquid search deliver critic',
    })

    const from = lcd.wallet(mk).key.accAddress;
    const to = "xpla1mcvhqcnjwry046rcys68hrvvefq7zvyve2tjwz";
    const token = { axpla: 25 };

    const signedTx = await lcd.wallet(mk).createAndSignTx({
        msgs: [new MsgSend(from, to, token)],
    });

    const txResult = await lcd.tx.broadcastSync(signedTx);
    console.log("Your Transaction Hash: " + txResult.txhash);
}
main()
After you get the resulting transaction hash, use xplad to search for it. You'll be able to retrieve the transaction data successfully.
The code above isn't significantly different from the code used to create transfer transactions on the testnet in the previous step. The main change is in the LCDClient's initial values. Only the chainID and URL values have been adjusted to match the Local Network. As a result, all the JavaScript code you've used so far can be seamlessly applied to the Local Network by just modifying the LCDClient's initial values.
Wrapping Up
So far, we've explored how to set up the XPLA blockchain Local Network. Now, with the Local Network at your disposal, you can experiment with various approaches within the XPLA blockchain and even dive into developing your own Web3 games.